Dessert Reception

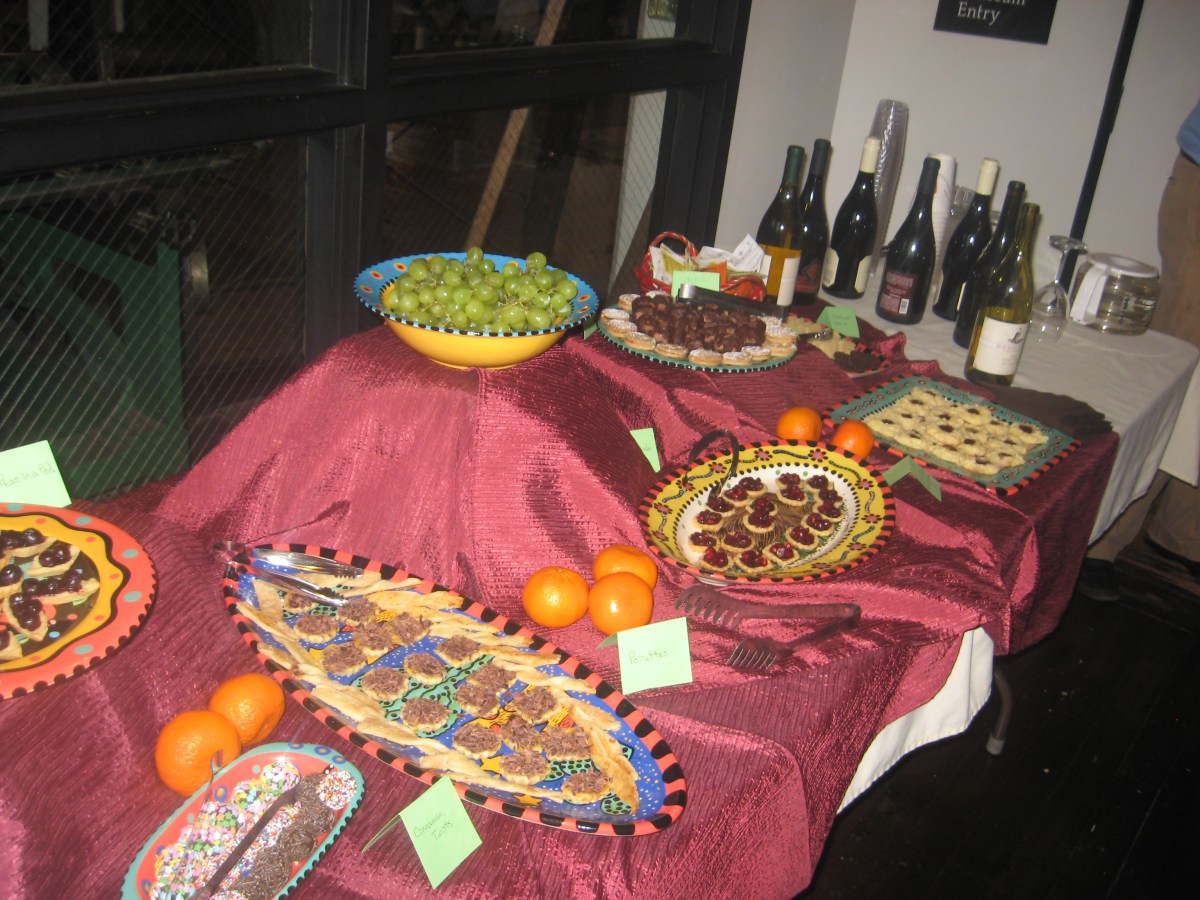
Hi all!  Over the coming weeks I’ll show you recipes for these, but right now, I would just like to show you pictures from a private wine/dessert reception that I made the desserts for this past weekend.

One of the goodies I made were ooey, gooey, chocolately Brigadeiros, a Brazillian candy which I took the liberty of making more chocolaty and less sweet as well as adding some vanilla to.

These are some of the tins that I used in making three kinds of tartlets…

The tartlets were Peas in a Pod, where I made a fresh blueberry pie filling and put a couple of berries on each of the tartlet shells,

Scheherazade, which I adapted from Flo Braker’s Sweet Miniatures, a tartlet with candied craisins (sorry Flo; fresh cranberries were not available; besides, I actually liked the craisins 🙂 and pomegranate seeds,

and Poirettes, also adapted from Sweet Miniatures, a tartlet with tons of flavor going on – pear, almond, rum (just a teeny bit), vanilla, lemon, apricot, and chocolate!  It came together beautifully…

Pardon the funky picture; I can’t get the blog to accept the rotated picture.  The Poirettes are in the middle with Cinnamon Twists (made out of a cottage cheese pastry dough!) surrounding them.

In addition to the tartlets, I made several cookies.  Drei Augen, also adapted from guess where? 🙂  yep, Sweet Miniatures, are an almond, shortbread german cookie (the name translates to three eyes) with a raspberry jam filling (sorry again Flo, I’m not a currant person so didn’t think I’d like currant jam in them.  I’ll try it sometime when I’m not making them for a reception).  I made four desserts for the reception from her book ’cause it was so perfect for this kind of event.  However, beware there are a few errors in the book 😦  Still a wonderful book tho!

The Drei Augen are the cookies around the outside.  In the middle are TCT bites, a triple chocolate torte made into bite-sized cakes.  Mmmmmm good! 🙂

Cream Cheese Thumbprint cookies I adapted from a recipe that I got from my aunt many, many years ago.  I’ve always loved these cookies, but have never done them as thumbprints before.  I wanted to add some color to them tho so voila!

Last of the cookies were a plain shortbread cookie, which I liked so much when I made these from thekeenancookbook.com, that I decided to use them here.  Unfortunately, I forgot to get a picture of them tho 😦  I also forgot to take a picture of the salted, burnt caramel flavored chocolate coins tho I put some in the freezer so I’ll still post these later.  I originally got the recipe from foodwishes.blogspot.com video recipes.

And the little boy showing off the cheesecake cookies with his hand?  My youngest munchkin…

Cracker Cookies

Many of my favorite dessert recipes originated from my Grandma.  This is another of those.  She was an outstanding cook and whenever we’d visit at Christmas, I’d sneak cookies out of the back room where she kept them.  It didn’t matter that some cookies were already set out, I wanted to see what other kinds were there as well. 🙂  I also copied a few recipes each time we visited.  When she passed, I was given her much treasured recipe box.  She made two kinds of cracker cookies.  One was with graham crackers and called Sunshine Crisps; this one is made with saltines and simply called cracker cookies.  They take a couple of minutes on the stovetop and 10 minutes in the oven.

Gather together a sleeve of saltine crackers and lay them out on a 10.5″ x 15.5″ (27 x 39 cm) stoneware dish with a short lip if you have it.  Otherwise, a jellyroll pan or other pan with sides will work fine, but you will want to cover the bottom with parchment or heavy duty foil.

Next you’ll gather together vanilla extract, butter, brown sugar, and chocolate chips (I prefer semi-sweet for this recipe.)  If you’d like to make these Christmasy, also put a couple of candy canes in a zip-closed bag and smash them with a sturdy saute pan to crush them.

You’ll need a small saucepan to melt together your butter and sugar.  Once melted you simply add the vanilla and pour the mixture over the saltines.  Pop it in the oven for 10 minutes, remove, and add your chocolate and mint if desired.

Separate and cool in the fridge and you’re done!

Here are the details:


Ingredients:

About 40 saltine crackers

1 c. butter (1/2 lb, 227 g)

1 c. lightly packed light brown sugar (200 g)

9 oz chocolate chips (255 g)

1 tsp vanilla (5 ml)

candy canes or peppermints, optional.


Directions:

Preheat oven to 350 F (177 C).

Lay saltines out on a 10.5″ x 15.5″ (27 x 39 cm) stoneware jelly roll pan or other pan with a short lip around the sides.  If you do not use stoneware, line your pan with parchment or heavy duty foil before laying out the crackers.  If you don’t they will stick big time.

Put butter and brown sugar in a small saucepan on medium heat.  Melt completely and remove from heat; this takes 1-2 minutes.  Stir frequently, do not boil, and do not leave this on the heat too long or it will thicken and burn.

Add the vanilla extract to the butter and brown sugar mixture and pour over the saltines.

Put in the preheated oven for 10 minutes.

Remove, add chocolate chips and let them rest a moment.  You’ll see them turn glossy.  Spread them to cover the crackers. Sprinkle with crushed mints if desired (To crush: throw them in a zip-closed bag and smash them with a sturdy saute pan.).

To cool, remove them from the stoneware to either a large plastic container or lined cookie sheet (wax paper, parchment, or the glossy side of freezer paper all work well) and put it in the fridge.  I don’t recommend cooling first and then separating as they’ll stick together.

Enjoy!


Frosty the Fudgeman

Hi Blog!  I’ve missed you 😦  Let’s make some fudge shall we?  I have a recipe that was handed down from my Grandma to my Mom to me.  I’ve been making it since I was about 9 years old.  It’s quick, easy, creamy, and delicious.  Don’t have a candy thermometer?  No worries; you can still do this.

A word of caution.  While I started making this as a kid, please please please supervise closely if you are allowing your kid to make this.  I recommend making it yourself first, so you know what to expect.  Sugar burns are nasty.  Please be very, very careful. Also note, this pot is heavy when you pour it out; you’re pouring 3-1/2 pounds of fudge. Doesn’t sound like a lot of weight, but it sure feels it when you’re holding the pot in one hand and and scraping it out with the other.  Rest it on a hot mat if you need to.  And if you want seven pounds of fudge?  Don’t double it; make it twice.

Another word of caution.  It’s addictive 🙂

Here’s all you need:

Update: Be sure to check your labels to confirm all items are gluten-free if you are gluten intolerant!

semi-sweet chocolate chips, milk chocolate candy bars (It originally called for three 5-cent Hershey bars.  They’re a bit more expensive now :)), marshmallow creme, evaporated milk, and sugar:

oh, and a marble slab or plastic mold and some butter to coat.  If you don’t have these, then a cookie sheet or regular casserole dish will work just fine.

A candy thermometer will be handy to have, but is not an absolute necessity.  If you don’t have one, grab a clear glass and fill it with ice cold water.

Let’s talk candy cooking stages for a moment.  You’re going to put the milk and sugar into a large sauce pot and cook it for about ten minutes, bringing it to a stage of boiling called “soft ball” stage.  This is because when you drop a bit of this mixture into cold water, it will literally form a soft ball.  It will be 234 F (112 C) on your thermometer.  My thermometer says 240 F (116 C) is soft ball stage.  If yours does, too, ignore it or you’ll have grainy fudge.  Initially the milk and sugar mixture does nothing, and stays that way.  Then all of a sudden it decides it’s time to boil and and will look like this…

And it will rise. Fast.

See how it rose about an inch and is more golden colored?  Once it gets here, it will stay here a few minutes.  Watch the thermometer crepe up.  Again, if you don’t have a thermometer, just test your mixture.  If your water is ice cold and the mixture goes splat, it has not cooked enough.  Wait a minute and try again.  You’ll eventually see it form a ball.  Put your fingers in and feel it; it will be squishy.  If you cook it a bit too long, it will form a hard ball (hard ball stage) and if you cook it a lot too long you’ll eventually reach hard crack stage where the mixture will literally spin a hair in the cold water.  This is peanut brittle, not fudge.

Once you’ve reached softball stage, you simply remove it from the heat, add the chocolates and marshmallow creme, stir and poor onto your slab or into your mold.  I buttered my mold and added confectioner’s sugar for ease of release and to make it look like Frosty 🙂

Stover’s Fudge

Update: Be sure to check your labels to confirm all items are gluten-free if you are gluten intolerant!

4-1/2 c. (855 g) white sugar

1 lg can (12 oz, 359 ml) evaporated milk     [_not_ sweetened condensed milk]

1 lg package (12 oz, 340 g) semi-sweet chocolate chips

3 milk chocolate bars [1.55 oz. (44 g) each for a total of 4.65 oz (132 g)]

1 jar marshmallow creme (7 oz, 198 g)

2 c. nuts, optional

Cook sugar and milk together until soft ball stage. (See notes above recipe for candy stages.)  Stir constantly or it will stick.  Remove from fire.  Add marshmallow creme, chocolate chips, chocolate bars, and nuts (if using).  Mix well and poor into buttered dishes.  Cool.

This cools really fast when you pour it onto a cool surface so don’t worry about it running over the edge of the slab.

To serve, I cut pieces as needed.  If you cut it in advance they’ll dry out.  For gift giving, cut off small sections and wrap in plastic wrap.

Enjoy!

%d bloggers like this: