Cinnamon Roll Pecans

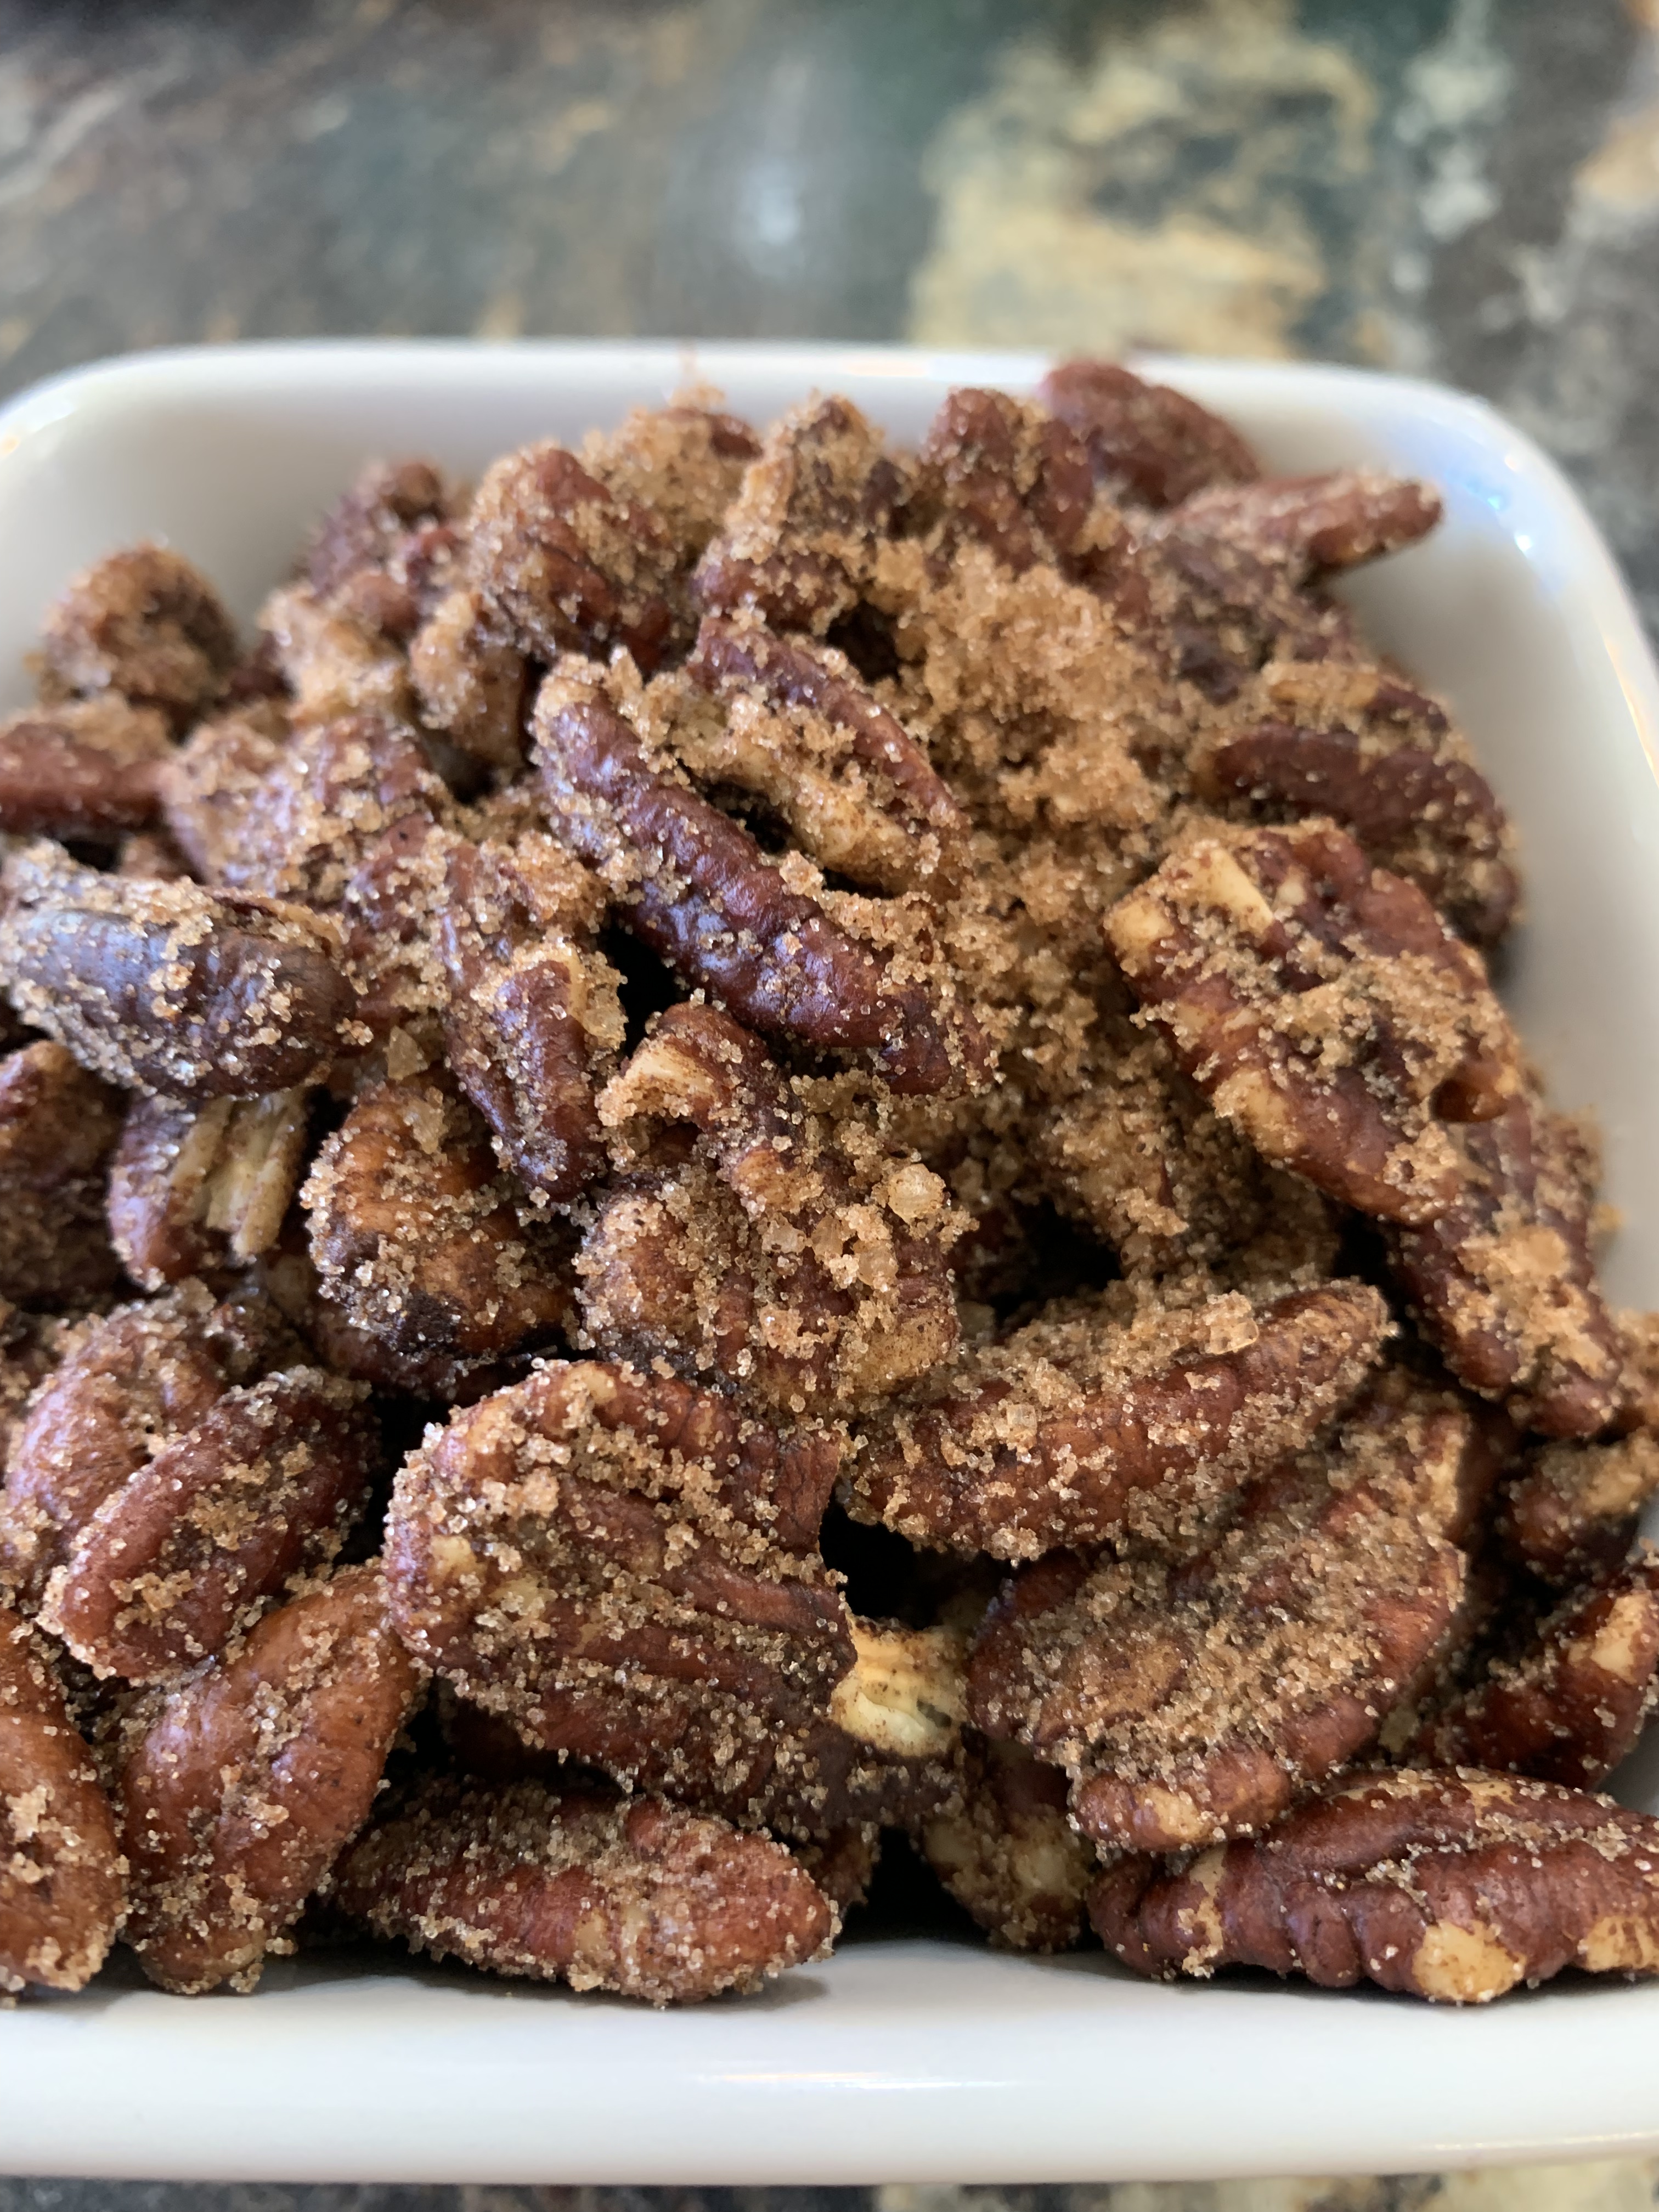
As winter and winter holidays come upon us, the time for having handy snacks and appetizers is here. One of my sons popped out of the shower this morning to ask if he smelled cinnamon rolls. Nope, these were pecans with a light glaze and lovely cinnamon roll spices.

This recipe was inspired by a recipe at cooksillustrated.com for warm-spiced pecans with rum glaze; however, I wanted something a little easier with measurements (anyone have an 1/8th teaspoon measure?), a little easier with timing, and a little more like cinnamon roll filling flavor, with no rum. Rum is great in hot-buttered rums, but not on pecans. It’s not a flavor my kids really like.

These are really simple to make:

  1. Roast the pecans
  2. Prep the spice mix
  3. Prep the glaze
  4. Put pecans in the glaze, and then the mix.

A little side note – I was curious as to the difference between roasting and baking since these are solid, like a meat or veg, but lower temperature. It seems that most agree that roasting is high heat (400+ F), and usually done on something that is solid like meat or veg and baking is lower heat (375 F or lower), not an open flame, and for making cookies and cakes. Most people don’t bake at say, 390 F so I’ll ignore the numbers in between at the moment 🙂 These nuts don’t really fit either, but I think they’re closer to roasting because they already have a shape; it’s not transforming a batter or dough into a new shape with baking.

Back to the nuts; they’re waiting…

Ingredients

2 c. (8 oz, 225 g) raw pecans

Warm spice mix

  • 2 Tbsp sugar
  • 3/4 tsp kosher or coarse salt
  • 1/2 tsp ground cinnamon
  • 1/4 tsp ground cloves
  • 1/4 tsp ground allspice

Glaze

  • 2 tsp vanilla extract
  • 1 tsp brown sugar (dark or light is fine)
  • 1 Tbsp soy-free Earth Balance (or butter if you can have that, or whatever butter substitute you use)

Directions

  1. Preheat the oven to 350 F (180 C), rack in the middle position.
  2. Line a griddle pan or cookie sheet with parchment and pour nuts in an even layer onto the pan.
  3. Bake 5 min, stir, and bake 5 min more. The nuts should be slightly darker than originally and have a nutty aroma.
  4. Let the nuts cool a bit while you prep:
    • mix together the warm spice mix ingredients in a bowl
    • melt butter with brown sugar in a saucepan (or microwave together); then add the vanilla.
  5. Add the nuts to the hot glaze; mix together.
  6. Add the now-glazed nuts to the spice mix; mix together.
  7. Enjoy!

Notes

For steps 4-6, you have the option of prepping so you can move the nuts from one station to the next or prepping in 2 small bowls and just have a different bowl ready for the nuts. I do the former, using bowls big enough to just move nuts from one station to the next.

If you don’t have an oven thermometer, I highly recommend getting one. It could make the difference between browned nuts and burnt ones. Also, get to know your oven and calibrate it if possible. If not, don’t worry about it, just use an oven thermometer to learn your oven’s behavior. For example, I have to keep an eye on my oven thermometer for longer bakes because it’s erratic and will go 50+ degrees higher than what it’s set for, but for short bakes, if I want 350 F, I preheat it to 325 F.

And don’t wait too long to have some. They disappear fast…

Practically Perfect Pumpkin Muffins

Omg. I made these today during a break between meetings and they were wonderful. Warm, soft, moist, fall-spicey, pumpkin pie in a muffin, and obviously I couldn’t decide which picture to post, so you see them with and without a streusel on top. Honestly, these don’t need a streusel, but you can do one if you’d like; otherwise, just sprinkle the top with a little sugar (like, very little, probably less than a teaspoon for a dozen muffins; the recipe makes 17-19 muffins).

In developing this recipe, I took inspiration from a recipe for Scrumptious Blueberry Muffins on the back of a bag of Bob’s Red Mill Gluten-Free 1-to-1 Baking Flour (light blue bag). The problem? I’m not really into blueberries. So I switched out the blueberries, modified quantity of pumpkin, added spices, and accidentally melted my (dairy-free) butter (oops :). The streusel is adapted from Dorie Greenspan’s Baking: From My Home to Yours. For spices, I referred to Nick Malgieri’s How to Bake from 1995, an excellent cookbook, and one of my first baking cookbooks. When I had modified a pumpkin muffin recipe from there for gluten-free, it was very good, but it was a bit dense. I saw the blueberry one on the 1-to-1 Baking Flour bag and the amount of sugar caught my eye because that was very different from the other recipe. The other ingredients were a bit different as well, but not as much as the sugar. I thought, hmmm, and well, voila.

I’m so happy I didn’t start over when I accidentally melted the butter. Normally you want to cream *softened*, not melted, butter and sugar to incorporate air and build volume so I was worried these were going to be flat as a pancake, but they weren’t! I’ve made the recipe multiple times now and had success with all.

A note on measures. If you’re weighing, don’t worry about being a few grams off with something like flour or pumpkin. My scales measure by 5 g, not by 1 or 2, and a teaspoon or 2 different isn’t going to make that big a difference. If you want to use cup measures, that’ll work, too. Just remember to loosen up the flour before scooping or spoon it in and level it off; don’t pack it down. You’ll get more consistent results with scales tho 🙂

With pumpkin, I’ve made these with 1 c (240 g) and 1-1/4 c (300 g) of pumpkin. Both work well, but I prefer the results with more pumpkin. The texture and fluffiness of the batter and resulting muffin, as well as the flavor, is better.

This is right after I popped them in the oven. I realized I forgot to take a picture so broke a cardinal rule of temperature maintenance and opened the door 🙂

Ingredients

  • 2 c (300 g) Bob’s Red Mill Gluten-Free 1-to-1 Baking Flour (blue bag)
  • 2 tsp baking powder (for homemade corn-free, gf substitute see note below)
  • 1/2 tsp fine salt
  • 1/2 tsp ground cinnamon
  • 1/2 tsp ground nutmeg
  • 1/4 tsp ground cloves
  • 1/2 c (1 stick, 1/4 lb, 115 g) dairy-free butter, melted and cooled (I use soy-free Earth Balance sticks.)
  • 1-1/4 c (250 g) granulated sugar
  • 2 lg eggs
  • 1/2 c (120 g) buttermilk (I use 1 tsp apple cider vinegar + unsweetened almond milk)
  • 1-1/4 c (300 g) canned pumpkin (*not* pumpkin pie mix)
  • streusel or 1.5 tsp sugar (see below for streusel info)

A note on baking powder – It’s been so long since I bought it at the store, I’m not sure if there are corn-free versions available now or not. I make mine and it’s very easy, just 1/2 tsp cream of tartar, 1/4 tsp baking soda, and 1/4 tsp tapioca starch (or potato starch or arrowroot) is equal to 1 tsp baking powder. The starch isn’t even technically needed; it’s just there to make the equivalent of 1 tsp baking powder in recipes and to keep it from clumping if you make it in larger quantities. I make it in 1/4 c. batches so I have it on hand – 2 Tbsp cream of tartar; 1 Tbsp baking soda; 1 Tbsp starch

Streusel: If you’d like to top your muffins with a streusel, mix 1/4 c. flour, 1/4 c. light brown sugar, and cut in a couple tablespoons of non-dairy butter. (Cut in the butter; don’t blend ’til smooth.)

Directions

  1. Preheat oven to 375 F.
  2. Line muffin cups with foil liners; I used 18 liners, using 1 12-muffin pan and half of another 12-muffin pan.
  3. If you haven’t already, melt a stick of dairy-free butter in a small bowl in the microwave and let cool to room temperature while you prep the rest.
  4. Whisk together flour, baking powder, salt, cinnamon, nutmeg, and cloves. Set aside.
  5. Put butter in mixer bowl and add sugar. Mix a couple of minutes ’til fluffier (I used the flat beater.), scraping down with a rubber spatula a couple of times.
  6. Add eggs 1 at a time, beating well after each addition.
  7. Add pumpkin, mix well.
  8. Add buttermilk and flour 1/2 at a time, alternatively, mixing after each addition and ending with flour.
  9. Spoon batter into muffin cups.
  10. Sprinkle with sugar or streusel.
  11. Bake 20 min. Muffins should be golden brown and tops should bounce back back if you push down lightly with your finger.
  12. Enjoy!

Hot Chocolate

Ok, super short post, but this is necessary since the weather is getting colder and it’s time for hot chocolate.

You want hot chocolate, but don’t have any mix in the house, and the good stuff is pricey anyway. Just make some yourself. Have sugar? cocoa powder? Great, that’s the basics right there. Just remember 2:1 — 2 parts sugar to 1 part cocoa. Then you can add a pinch of salt, a couple dashes of cinnamon, or whatever else you’d like. You can make up some mix and put it in a container for now and later. Then to make it, take 2 tsps of mix, 1 cup warmed milk (I use unsweetened almond milk.), maybe a squirt of vanilla extract, and you’re set.

A couple of years ago there seemed to be a dutch processed cocoa craze, but I find it limited in use and generally don’t buy it. It’s just cocoa processed with alkali, but because of the alkali it doesn’t work as well in most recipes that call for cocoa powder. Usually they’re talking about the normal stuff, not dutched. Dutched does make great hot cocoa tho, so feel free to use that here. If you’d like to learn more about dutch processed cocoa, there’s a great article here on Serious Eats: https://www.seriouseats.com/difference-dutch-process-natural-cocoa-powder-substitute.

Now, on to the recipe…

Ingredients

The first 4 are for the cocoa mix:

  • 1 c. (200 g) sugar
  • 1/2 c. (about 50 g) cocoa
  • pinch salt (optional, about 4 twists of a salt mill)
  • couple dashes cinnamon (optional, or chile, also optional, or neither)
  • 1 c. (8 oz, 240 g) milk
  • vanilla extract (optional)

Directions

  1. Warm up 1 cup milk in the microwave.
  2. Place 2 heaping teaspoons cocoa mix in your favorite hot chocolate mug. Put the rest of the cocoa mix in another container for later use.
  3. Add a little bit of the warmed milk (maybe 1/4 c? You just need enough to dissolve the mix.). Stir well.
  4. Add the rest of the milk and a squirt of vanilla if you’d like. Stir.
  5. Top with non-dairy topping, marshmallows, etc or not.
  6. Enjoy!

I know I should show a picture of a nice wide, white mug with hot chocolate and whipped cream or marshmallows, but 1) I didn’t use whipped cream, 2) it was in my Lego mug, and 3) I drank it before I got a picture. So, silly picture time. See in the instructions how I didn’t add the milk all at once? That way the cocoa mix all dissolves and stirs up smoothly. No powder glops while I was drinking or in the bottom of the mug:

Roasted Pumpkin Seeds

These are super easy and a great snack this time of year so before you compost or bin those leftover, decorative, uncarved pumpkins from Halloween, cut ’em open and save some of those seeds! These can be seasoned with your favorite herb or spice in the kitchen. I love garlic so this time I used garlic powder. The hardest part of this recipe is getting the seeds from the pumpkin 🙂

Ingredients

  • 1 c. pumpkin seeds
  • olive oil
  • salt
  • seasoning (your choice. Some ideas are garlic powder, chile powder, rosemary, etc.)

Directions

  1. Preheat oven to 350F (180C).
  2. Rinse pumpkin seeds, pulling out remaining bits of pumpkin, and pat dry.
  3. Spread the seeds on a griddle pan or cookie sheet.
  4. Drizzle with olive oil.
  5. Use salt mill or fingers to generously sprinkle with salt.
  6. Sprinkle generously with garlic powder or your choice of seasoning.
  7. Use your fingers to mix up the seeds with the olive oil and seasonings; shake gently to even out the layer of seeds on the griddle pan.
  8. Bake for 25 min; stir; bake 5 min more.
  9. Enjoy!
%d bloggers like this: