Chile Rellenos Casserole – Gluten Free and Dairy Free

First, “chile”, “chili”, or “chilli” – are all basically the same, just vary in use by location, hence the reason I’m always confused as to which to use. I’ve lived in the southwest where “chile” is used most of the time and in other parts of the states where “chili” is usually used. I already have this recipe (with full-on wheat and dairy) as one of the first recipes on this blog, but called it Chili Rellenos Casserole and I’m just gonna leave it that way. If you can have and want the wheat and dairy, feel free to pop over to that one. If not, read on for one made with eggs, gluten-free flour and Daiya dairy-free cheese shreds. (It’s just as good!) I also make my own tomato sauce, but you can absolutely use something like Muir Glenn pizza sauce (yum!).

This recipe is super forgiving. Only have 3/4 of a can of tomato paste for the sauce? That’s ok. Put in too much flour accidentally? (oops) That’s ok, too (phew!); just add another egg to compensate. Forget that you’re out of the flour you want for the recipe, but have already cracked the eggs? A rough mix of 1/2 non-starchy flours (e.g., rice flours) and 1/2 starchy flours (e.g., tapioca starch) should work.

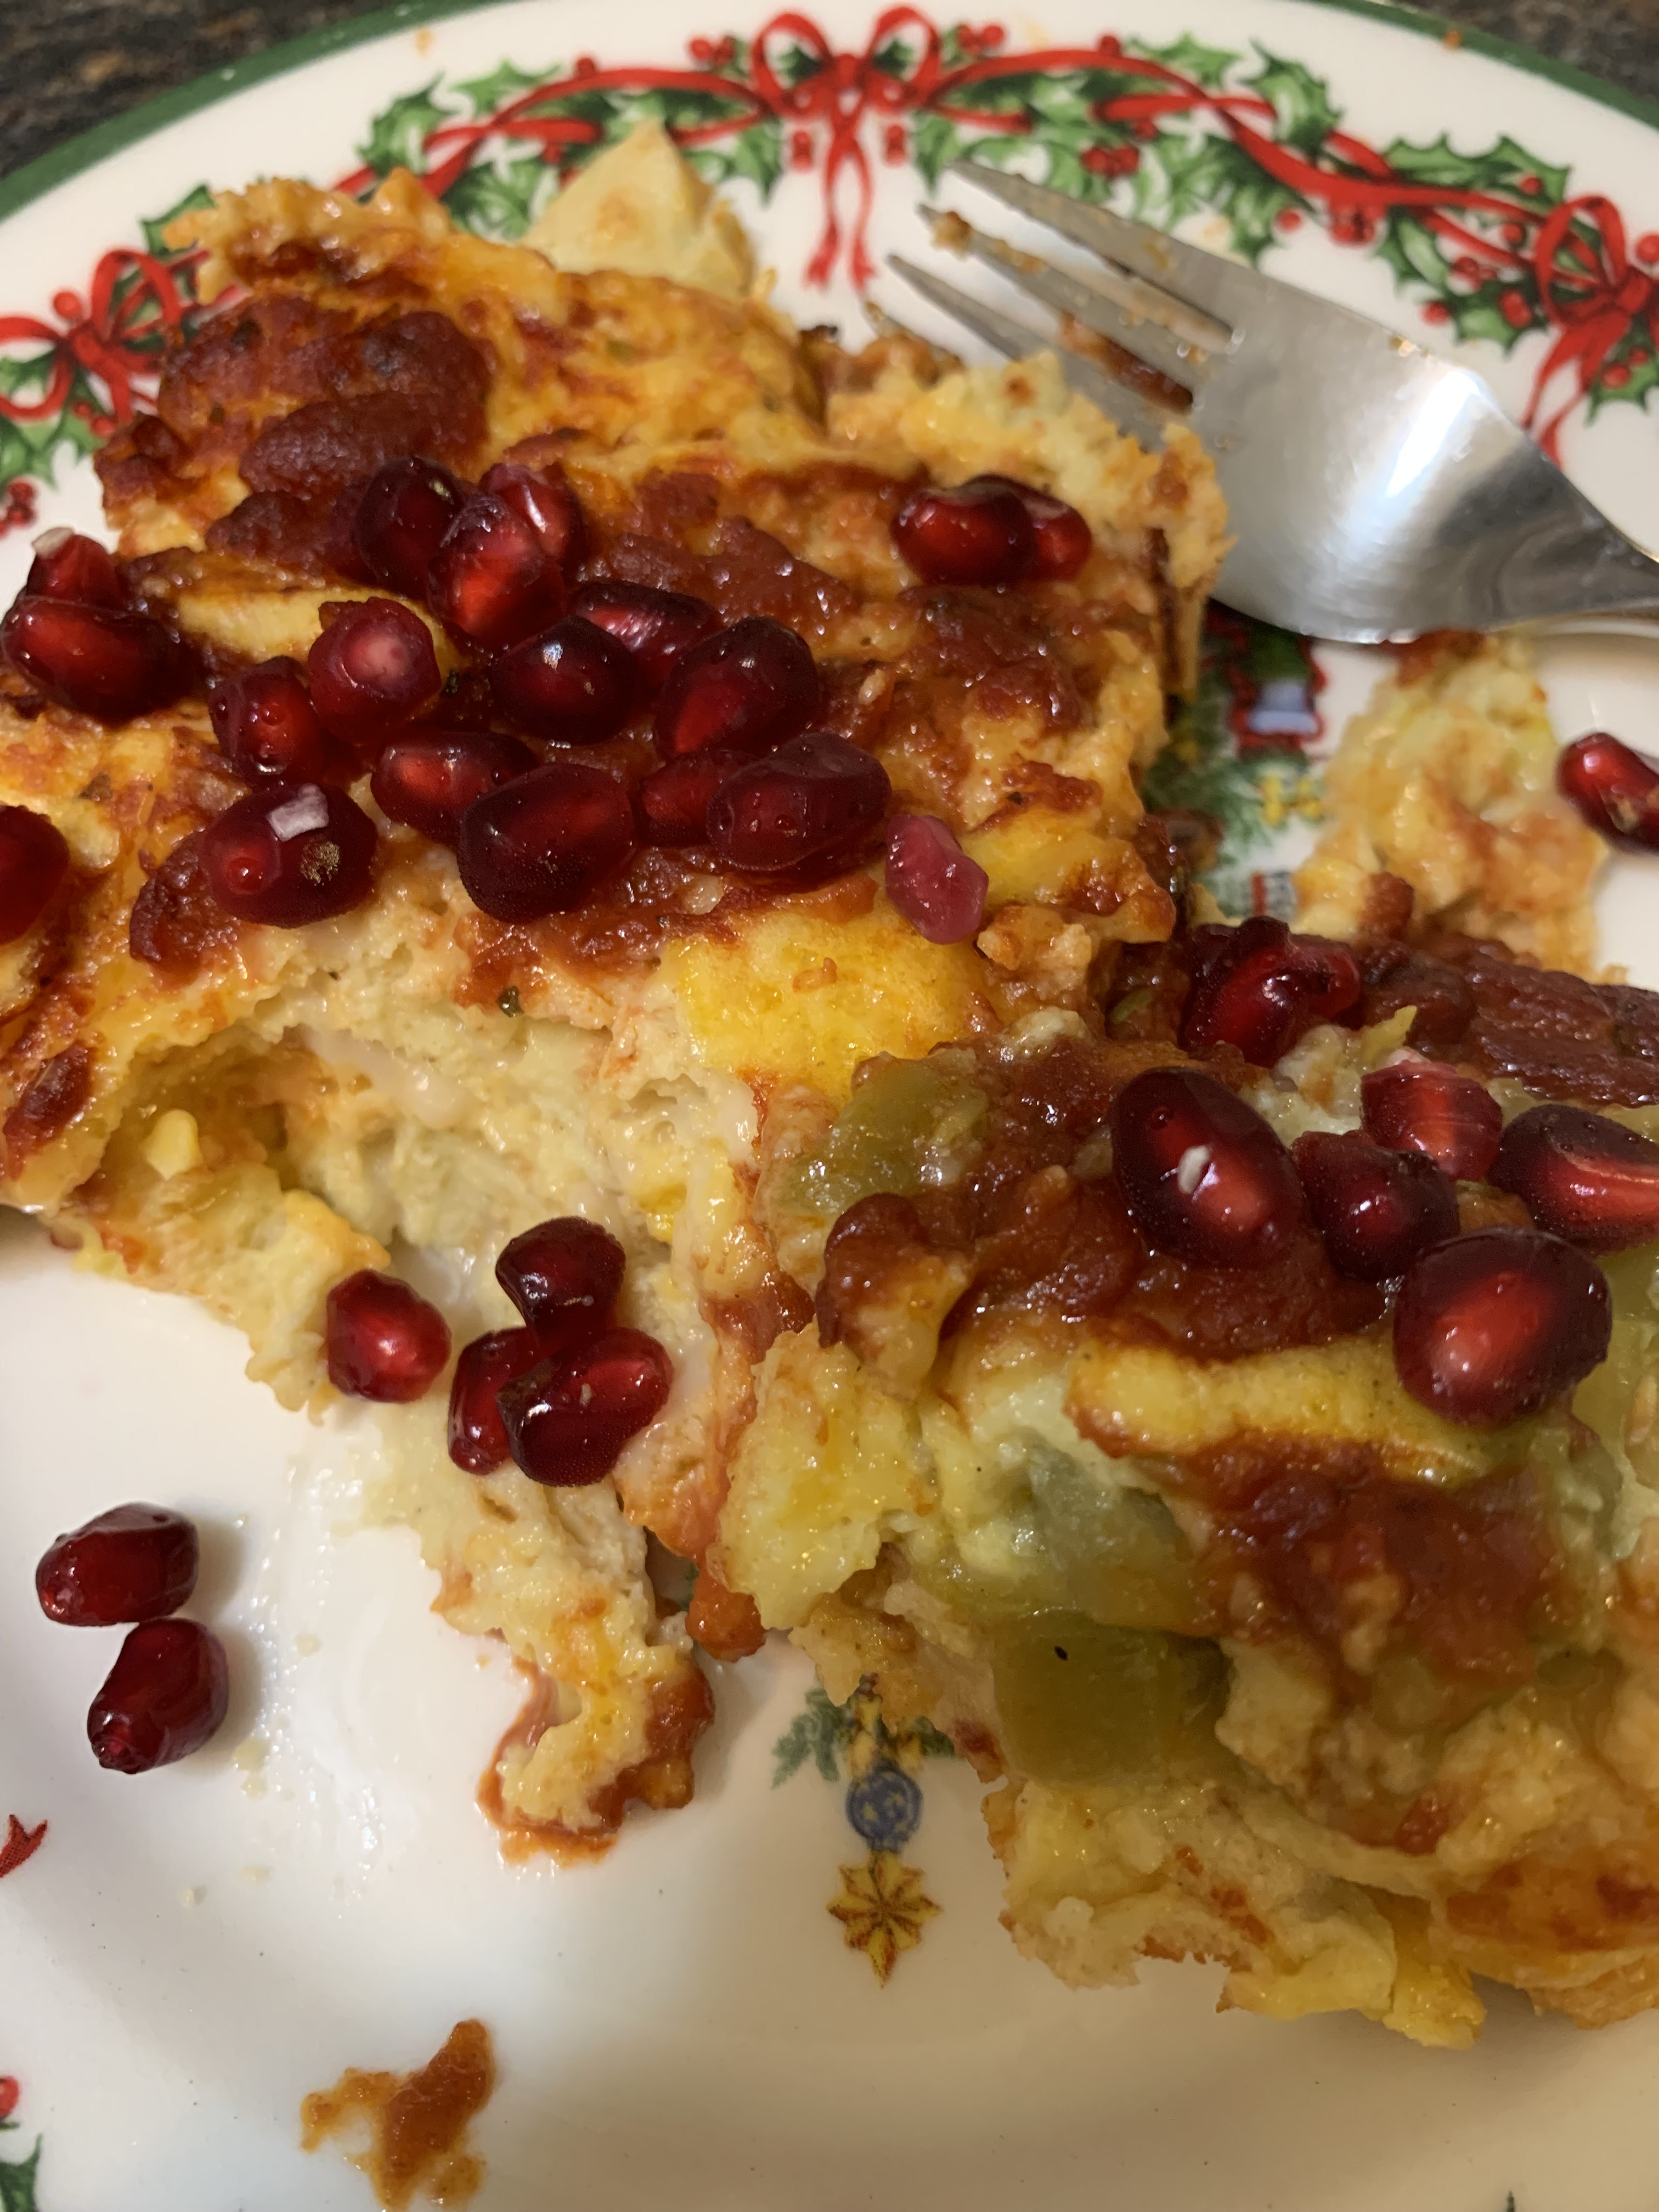
It’s also super tasty 🙂 When I make this, I use two rectangular dishes now [2.75 Qt (2.6 L), 9.5″ x 7.5″ at the top] because I make one with the chiles, and one without. Both are very popular and there are no leftovers.

Make sure to gather everything up (mise en place – “everything in it’s place”) and let’s get started…

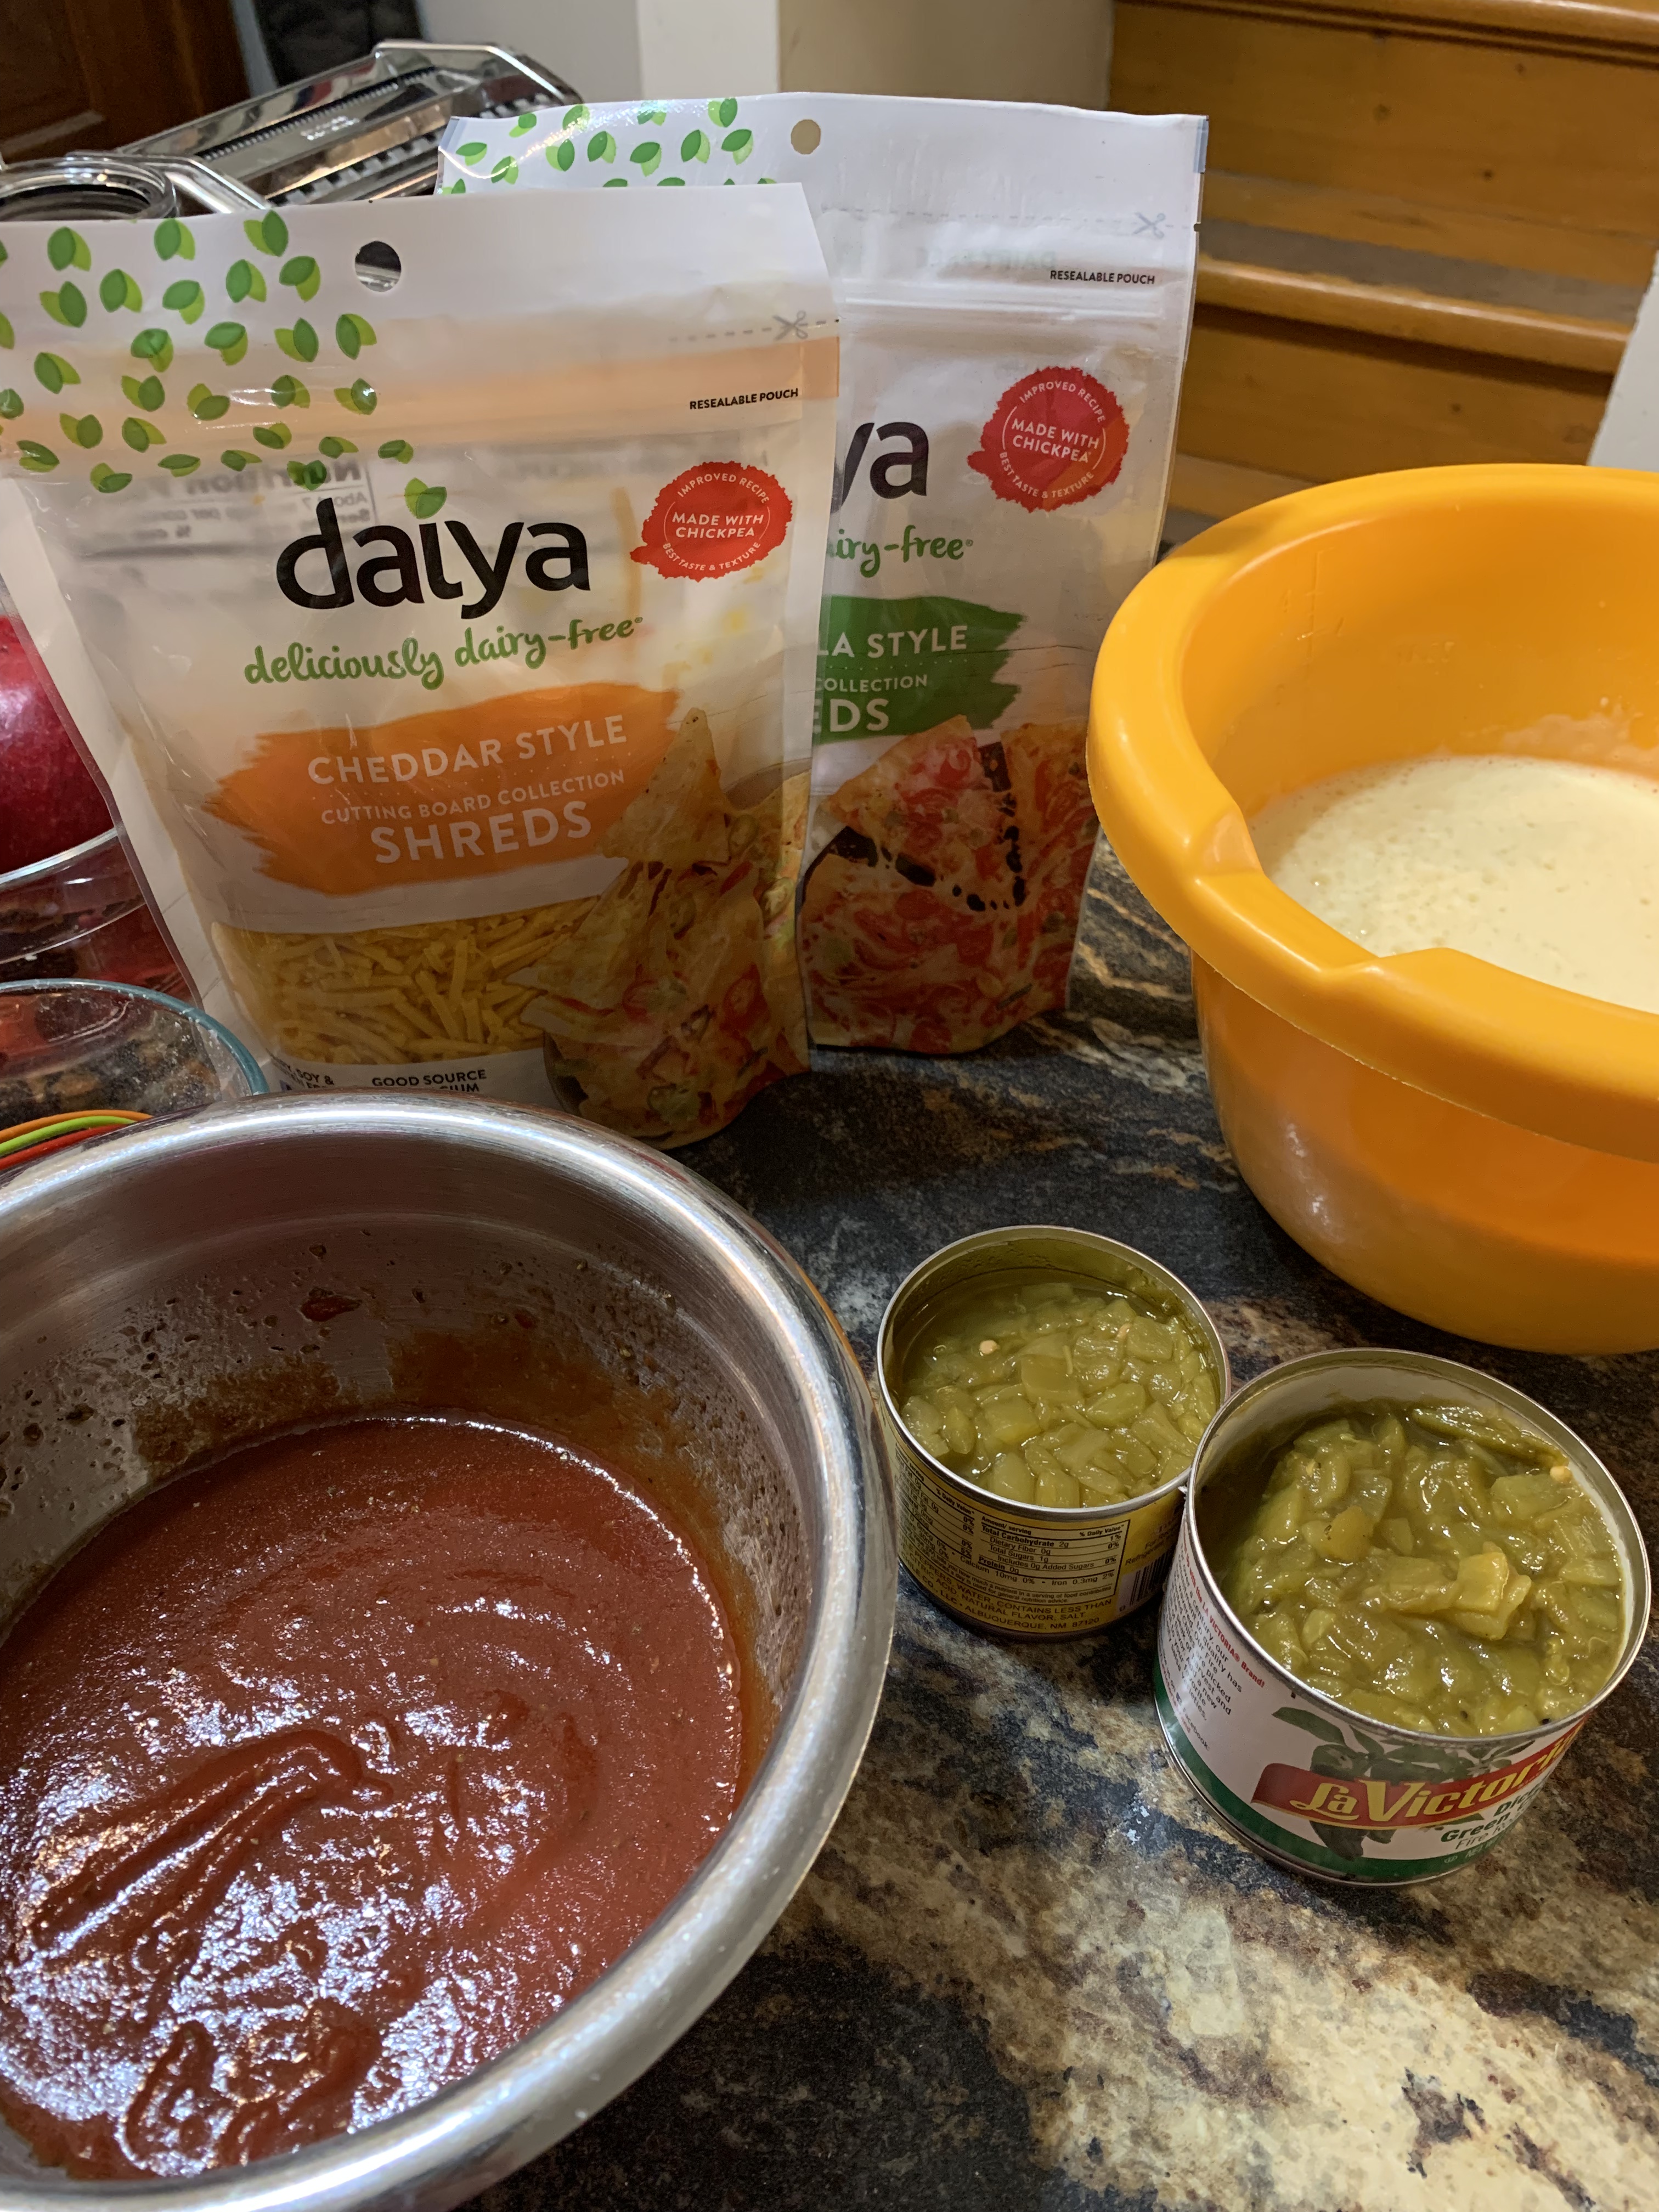
I’ve already mixed the eggs, milk, and flour here.

Ingredients

  • 8 large eggs (455 g)
  • 2 c (480 g or ml) unsweetened almond milk
  • 1 c (150 g) Bob’s Red Mill 1-to-1 Baking Flour (blue bag; technically it’s 148 g, but 150 g is what I do)
  • 1 bag (200 g, 7.1 oz) Daiya cheddar cheese shreds
  • 1 bag (200 g, 7.1 oz) Daiya mozzarella cheese shreds (or use Daiya pepper-jack shreds for more kick)
  • About 2 c (425 g, 16 oz) your choice of tomato/pizza sauce (Muir Glen pizza sauce is great or make your own – See note below.)

Sauce: Wow. I gotta say after looking around on All Recipes at pizza sauce recipes that people there are way overcomplicating this. There’s no need to cook it and no need for a lot of different ingredients. This is what I do and it’s the same sauce I use when I make pizza: I use 1 can (6 oz, 170 g) tomato paste, about 2 Tbls extra virgin olive oil, about 1.5 c (360 g or ml) water (don’t add all at once), dried oregano (couple teaspoons?), dried mince garlic (sprinkle generously), and some Penzey’s pizza seasoning if I have it on hand, with the key ingredient there being dried fennel. Whisk together as you add each ingredient. When whisking in the water, do so gradually. It will mix better and you can watch for the right consistency. All the herbs can be mixed in at once. You could add a teaspoon of sugar to cut the acid from the tomatoes, but there’s really no need to for this; there’s plenty of water to dilute the acid. Sorry for the lack of definition here; I don’t measure anything for this and I mix and add ’til the taste (tomato-y and herby, but not gritty), thickness (slightly thick, not watery), and look (fluffy and glossy) are how I like them.

Directions

  1. Preheat oven to 375 F (190 C).
  2. Butter 2 rectangular dishes w/dairy-free butter [2.75 Qt (2.6 L), 9.5″ x 7.5″ at the top]. If you only want a dish with chiles, you can use a 9″ x 9″ dish, but remember it will be thicker so cook at 350 F (180 C) for about an hour.
  3. Mix together eggs, milk, and flour. An immersion blender works nicely for this if you have one. You could also just put it all in a blender.
  4. If making your own tomato sauce, do that. (See note above.)
  5. Layer in dishes as follows, except remember to leave off the chiles and spicy cheese in one of the dishes if you’d like. I usually have some leftover cheese, using most, but not all of both bags:
    1. egg mixture
    2. cheeses
    3. chiles
    4. egg mixture
    5. cheeses
    6. chiles
    7. dollop on tomato sauce
  6. Bake for about 40 minutes or until done. It should look poofy and will bounce back if you touch it lightly in the middle. It will flatten a bit upon cooling.
  7. Cool a few minutes as it will be very hot.
  8. Enjoy!
Some of both, with pomegranate seeds on top 🙂

Practically Perfect Pumpkin Muffins

Omg. I made these today during a break between meetings and they were wonderful. Warm, soft, moist, fall-spicey, pumpkin pie in a muffin, and obviously I couldn’t decide which picture to post, so you see them with and without a streusel on top. Honestly, these don’t need a streusel, but you can do one if you’d like; otherwise, just sprinkle the top with a little sugar (like, very little, probably less than a teaspoon for a dozen muffins; the recipe makes 17-19 muffins).

In developing this recipe, I took inspiration from a recipe for Scrumptious Blueberry Muffins on the back of a bag of Bob’s Red Mill Gluten-Free 1-to-1 Baking Flour (light blue bag). The problem? I’m not really into blueberries. So I switched out the blueberries, modified quantity of pumpkin, added spices, and accidentally melted my (dairy-free) butter (oops :). The streusel is adapted from Dorie Greenspan’s Baking: From My Home to Yours. For spices, I referred to Nick Malgieri’s How to Bake from 1995, an excellent cookbook, and one of my first baking cookbooks. When I had modified a pumpkin muffin recipe from there for gluten-free, it was very good, but it was a bit dense. I saw the blueberry one on the 1-to-1 Baking Flour bag and the amount of sugar caught my eye because that was very different from the other recipe. The other ingredients were a bit different as well, but not as much as the sugar. I thought, hmmm, and well, voila.

I’m so happy I didn’t start over when I accidentally melted the butter. Normally you want to cream *softened*, not melted, butter and sugar to incorporate air and build volume so I was worried these were going to be flat as a pancake, but they weren’t! I’ve made the recipe multiple times now and had success with all.

A note on measures. If you’re weighing, don’t worry about being a few grams off with something like flour or pumpkin. My scales measure by 5 g, not by 1 or 2, and a teaspoon or 2 different isn’t going to make that big a difference. If you want to use cup measures, that’ll work, too. Just remember to loosen up the flour before scooping or spoon it in and level it off; don’t pack it down. You’ll get more consistent results with scales tho 🙂

With pumpkin, I’ve made these with 1 c (240 g) and 1-1/4 c (300 g) of pumpkin. Both work well, but I prefer the results with more pumpkin. The texture and fluffiness of the batter and resulting muffin, as well as the flavor, is better.

This is right after I popped them in the oven. I realized I forgot to take a picture so broke a cardinal rule of temperature maintenance and opened the door 🙂

Ingredients

  • 2 c (300 g) Bob’s Red Mill Gluten-Free 1-to-1 Baking Flour (blue bag)
  • 2 tsp baking powder (for homemade corn-free, gf substitute see note below)
  • 1/2 tsp fine salt
  • 1/2 tsp ground cinnamon
  • 1/2 tsp ground nutmeg
  • 1/4 tsp ground cloves
  • 1/2 c (1 stick, 1/4 lb, 115 g) dairy-free butter, melted and cooled (I use soy-free Earth Balance sticks.)
  • 1-1/4 c (250 g) granulated sugar
  • 2 lg eggs
  • 1/2 c (120 g) buttermilk (I use 1 tsp apple cider vinegar + unsweetened almond milk)
  • 1-1/4 c (300 g) canned pumpkin (*not* pumpkin pie mix)
  • streusel or 1.5 tsp sugar (see below for streusel info)

A note on baking powder – It’s been so long since I bought it at the store, I’m not sure if there are corn-free versions available now or not. I make mine and it’s very easy, just 1/2 tsp cream of tartar, 1/4 tsp baking soda, and 1/4 tsp tapioca starch (or potato starch or arrowroot) is equal to 1 tsp baking powder. The starch isn’t even technically needed; it’s just there to make the equivalent of 1 tsp baking powder in recipes and to keep it from clumping if you make it in larger quantities. I make it in 1/4 c. batches so I have it on hand – 2 Tbsp cream of tartar; 1 Tbsp baking soda; 1 Tbsp starch

Streusel: If you’d like to top your muffins with a streusel, mix 1/4 c. flour, 1/4 c. light brown sugar, and cut in a couple tablespoons of non-dairy butter. (Cut in the butter; don’t blend ’til smooth.)

Directions

  1. Preheat oven to 375 F.
  2. Line muffin cups with foil liners; I used 18 liners, using 1 12-muffin pan and half of another 12-muffin pan.
  3. If you haven’t already, melt a stick of dairy-free butter in a small bowl in the microwave and let cool to room temperature while you prep the rest.
  4. Whisk together flour, baking powder, salt, cinnamon, nutmeg, and cloves. Set aside.
  5. Put butter in mixer bowl and add sugar. Mix a couple of minutes ’til fluffier (I used the flat beater.), scraping down with a rubber spatula a couple of times.
  6. Add eggs 1 at a time, beating well after each addition.
  7. Add pumpkin, mix well.
  8. Add buttermilk and flour 1/2 at a time, alternatively, mixing after each addition and ending with flour.
  9. Spoon batter into muffin cups.
  10. Sprinkle with sugar or streusel.
  11. Bake 20 min. Muffins should be golden brown and tops should bounce back back if you push down lightly with your finger.
  12. Enjoy!

Ramblings on “Allergy Free” Baking and Gluten-Free “All Purpose” Flour

Update:

I was rereading this post from 7 years ago (!) and realized that very little has changed regarding gluten-free (gf) flours.  This is definitely worth a read imho if you’d like to learn about gf flours.  In some ways, so many things have changed.  There are many more gf products in the store than there was then and people are more aware of food issues than before.  If you’re doing your own baking tho, the flours to choose from are largely the same and all-purpose is still not truly for all purposes.  I still use brown rice flour, white rice flour, sweet rice flour, quinoa, sorghum, tapioca starch, potato starch, arrowroot, almond flour [tortillas! and chocolate chip cookies (NY Times gigantic, amazing cookies https://cooking.nytimes.com/recipes/1020871-gluten-free-chocolate-chip-cookies%5D, and occasionally millet.  For mixes, I use Bob’s Red Mill 1 to 1 Baking Flour (light blue bag) and Bob’s Red Mill All-purpose Baking Flour (reddish-brown/green/yellow bag).  Occasionally I use Pamela’s, but I don’t buy Bella at all any more.  I do make graham crackers, but I don’t use Teff.

The original post from Nov, 2014:

Those trying to address food allergies/intolerances in the kitchen see a couple of things frequently that I think everyone should be aware of the associated caveats that go with them — “Allergy Free” recipes and “Gluten-Free All Purpose” flour or baking mix.

“Allergy-Free”

There is no such thing as being allergy-free for everyone.  My oldest son is gluten-free and corn-free.  His is also mostly soy-free, dairy-free, and beef-free, with small exceptions for these last three.  His fish has to be wild, not farmed (they’re fed corn and soy and he can tell it by the increase in pain).  His chicken _can’t_ be organic (same issue as farmed fish) and he does ok with rice flour and can even have rice in small amounts now.  He couldn’t have it for a while, nor eggs and bananas.  Yet even with all of this, I would end up making stuff that other people couldn’t have (my son _can_ have nuts!).

Many recipe books assume corn is ok because they’ve addressed the big 8 allergies.  Nope.  Even Enjoy Life has corn in a few things. Just everyone, please be aware of what you’re putting in the food you make and what’s in the food you eat.

“All-Purpose” flour/baking mix

Gluten-free flours fall into about 4 categories — nut flours, bean flours, starches [white rice flour (fyi, I never use white rice flour, just brown) and corn, tapioca, potato, arrowroot and any other ‘starch’ flour I’m forgetting], and other flours (some call whole grain, but that’s a bit misleading).

I wish there were truly an all-purpose flour out there.  Even in wheat flour, all-purpose is ok, but not truly all-purpose.  Hence the reason I used to have all-purpose flour, pastry flour, bread flour, white whole wheat flour, etc.  Now?  I have brown rice flour, quinoa flour, sorghum flour, tapioca starch, potato starch, Bob’s Red Mill all-purpose flour, Bella’s all-purpose baking mix, and Pamela’s baking and pancake mix (she also makes a ton of other mixes by the way, including those for many baked goods!).  Apparently, I’ll need to add Teff to my inventory if I want to start making graham-like crackers.  There are other blends for sale such as Hodgson’s Mill, Better Batter, and Cup 4 Cup.  I’ve heard great things about c4c, but their original blend has ingredients my son can’t have (corn, dairy) and the other is a “whole-grain” style that I wouldn’t get as much use out of.  Hodgson Mill had amaranth flour, not my favorite (liquorice aftertaste… 😦 ).

What you really want to consider is what you would like to use the flour for and does the “all-purpose” mix fit your needs.  Some of it is a matter of taste and you will probably have to do some trial and error.  If you don’t like bean flours, you won’t want to use Bob’s Red Mill’s all-purpose flour probably.  But may I urge you to give it a try???  I use this for apple fritters (incredible) and chocolate chip cookies.  I’ve also used it for pizza crust, tho I prefer using a mix that I put together instead.  All-purpose flours with bean flour will give you a earthier taste.  I started to say heavy, but the fritters are most definitely light and yummy.  I’ll post those eventually.

If your all-purpose flour has starches (especially potato starch) and milk powders, it will be a lighter mix, good for something like banana bread and cookies.  Watch to see if there is salt or xanthum gum already in the mix. If there is, you don’t want to add more!  It will either turn out gummy or taste like salt.  Not good.

All-purpose “whole-grain” mixes probably won’t have starches and will lead to denser products; think whole wheat bread.

Another alternative is to simply make your own mix.  It could be as simple as 1/2 brown rice flour, 1/2 tapioca starch, or much more complex.  In general, I would start with 1/2 starches and 1/2 other “whole grain” kinds (by weight if possible).  There was a huge movement looking at ratios where some were concluding 40% starches and 60% other, but that really depends on your elevation, humidity, and taste.  Start with 50/50 and go from there.  If it’s too gummy, try less starches next time.  If it’s too heavy, try more!

Eventually you may want to add nut flours, including coconut, but bear in mind coconut flour absorbs huge amounts of liquid.

Personally, I make my own mix sometimes and use a store-bought one other times, depending largely on how fast I need it.  I do like Bella’s for an excellent pie crust tho.

Vanilla Blueberry Syrup

So I went to make waffles for the kids this morning and realized I was out of maple flavoring to make the syrup.  Ok, what to do.  Make Vanilla Syrup?  I use both vanilla extract and maple flavoring to make my syrup normally.  Then I remembered some blueberries I had in the freezer and thought, aha! blueberry syrup!

So I threw a cup of frozen blueberries into a saucepan, added water, white sugar, and brown sugar and brought it to a boil.  After a little while, when the blueberries were bursting and it was starting to thicken a little, I strained out the blueberries, squishing them a little in the strainer to get more juices out, and returned the syrup to the pan.

A little more thickening and it was time to taste.

A spoon. A sip. and aaaah 🙂

But then what did I do?!  Me and my vanilla habit 🙂  I added 1/2 a teaspoon (2.5 ml) of vanilla extract.  That was it!   Not much, right?  What did I discover?  That the blueberries really brought out the vanilla flavor 🙂

So it was still quite good, but I probably should have either left it as is or added just a smidge of lemon juice to brighten the blueberry flavor, like I do in my pie, if I truly wanted blueberry syrup.  Nonetheless I thought it was very worthy of a post, both for the flavor and for the bizarre discovery.

Thus Vanilla Blueberry Syrup was born, with a wonderful flavor of vanilla amongst blueberry overtones.

Ingredients:

1 c. (135 g) frozen blueberries

1/2 c. (4 oz, 113 g) cold water

1/2 c. (100 g) white sugar

1/2 c. (110 g) brown sugar

1/2 tsp (2.5 ml) vanilla extract

Directions:

1.  Put all ingredients except vanilla extract into a small saucepan.

2.  Boil 5 minutes or so, until the blueberries have burst, the syrup is a beautiful blue, and it has thickened slightly.  Use a spoon to sample it and you’ll be able to taste that it has thickened slightly if you’re in doubt visually.

3.  Strain through a sieve into a bowl, squishing the berries a bit to extract more juice.

4.  Pour it back into the pan and boil a few minutes more.  Note that I did this rather than straining at the end because it was easier to see how the syrup was doing.

5.  Stir in vanilla.

6.  Remove from heat and let it cool a bit and it will thicken more.

Enjoy!


UPDATE 2mar2012:  Changed ml measurement to grams for water.  Why use milliliters, a measure of volume, when everything else (except vanilla) is in grams, a weight?!  Why not give vanilla in grams?  For a couple of reasons.  One is that my scales are in increments of 5 grams, but rounding up vanilla to 5 grams would have a vastly different effect on a recipe than a difference of 5 grams of flour.  The other reason is that most non-US recipe sites that I see still use teaspoon measurement increments rather than grams for ingredients with such a small quantity even if everything else is in grams.

%d bloggers like this: