Around the World in Food – Australia, part 1

We’ve recently started a new tradition in our house.  Every Sunday we’re going to make a dinner from a different country around the world.  Notice I said _we’re_ going to make this.  It’s a family effort and we are having a blast with this!  Cooking, learning new things about a country, debating the country we’re going to do the following week, etc.  Great fun 🙂

So the first week was Australia.  Our meal consisted of wonderfully flavored meat pies, mashed potatoes, a delicious kiwi-banana-papaya fruit salad, and Anzac biscuits (cookies).  Notice what’s missing?  No vegetables!  Don’t know if they have a salad every night or what, but we all enjoyed it.  This is how we all were after dinner…

Let’s start with the dessert, shall we?  After all, that is the best part of dinner, no? 🙂

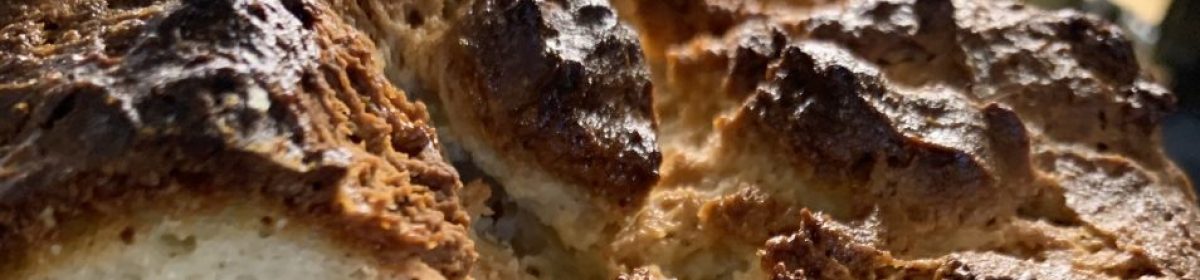
Anzac biscuits have long been associated with the Australian and New Zealand Army Corps (ANZAC) established in World War I.  According to Wikipedia, there are claims that these cookies were sent by wives to soldiers abroad because the ingredients do not spoil easily and they kept well during transport.  The spoilage part doesn’t make sense tho ’cause even if they had eggs in them (they don’t), the cookies were cooked.  How would they spoil?  What does make sense is that they would travel well.  These are a sturdy, crunchy cookie, but oh so good 🙂

So let’s get to these, shall we?

Unfortunately I wasn’t thinking so don’t have pictures of these in process.  The only difficult part of these is that the dough looks like crumbles when you’re done mixing it.  I found the best part was to grab handfuls, squish them into balls, and put them on my parchment-lined baking sheet.  They baked up just fine.

ANZAC BISCUITS (cookies)

(adapted from Aussie-Info.com)

Ingredients:

1 c. (90 g) rolled oats (I used quick oats; I’m sure old-fashioned would be fine as well.)

3/4 c. (54 g) shredded coconut

1 c. (120 g) all-purpose flour

1 c. (200 g) white sugar

1 stick (4 oz, 114 g) butter

2 T (30 ml, 41 g) light corn syrup

1/2 tsp baking soda

1 T (15 ml or g) hot water

Directions:

1.  These bake much longer than most cookies do, but at a lower temperature, so preheat your oven to 300 F (150 C).

2.  Line your cookie sheets with parchment.  (Lightly grease your cookie sheet if you don’t have a liner or parchment.  Note that parchment is wonderful — non-stick and easy cleanup!  I use Reynold’s or Wilton brands and just wipe mine off and stick it in the freezer for future use, reusing most sheets 4 or 5 times each.)

3.  Mix oats, flour, sugar, and coconut together in a large bowl.  Set aside.

4.  Place butter and corn syrup in a small saucepan and melt over medium heat.

5.  Mix hot water and baking soda together in a small bowl and pour into the butter/syrup mixture.

6.  Pour the liquid mixture over the dry ingredients and stir together.

7.  You will notice that the mixture is crumbly.  This is ok!  Grab bunches together with your hands, form balls, and place on your prepared cookie sheets a few inches apart from each other.

8.  Bake for 20 minutes.

9.  Remove from oven and cool on racks.  The cookies should be a golden brown color.

10.  Enjoy!

Eat Dirt Dessert

Here’s another no-bake recipe; sorry, but life is just not always what we expect, no?  I’ll get back to baking soon, but right now I’m at a time where I need less time/fuss recipes.  So my youngest munchkin turned 6!  I can’t believe it; my boys are just growing way too fast.  Being super strapped for time, I suggested this for his dessert and he loved it.  I adapted it from a recipe that was given to me twenty years ago (gulp :)).  It’s wonderfully creamy with a hit of chocolate and is pretty fast to put together (I think I took 30 minutes start to finish.).

All you need are Oreo cookies, vanilla pudding mix, milk, butter, cream cheese, and confectioner’s sugar.  I use lactose-free, fat-free milk ’cause that’s what I drink.  I also use Neufchatel cream cheese, which is lower in fat yet still really good, but everything else is the non-low versions.  Feel free to lighten up this recipe as you so desire with low sugar/fat or sugar free / fat free products.

EAT DIRT DESSERT 

Ingredients:

2 small packages (6.8 oz, 192 g all total) of instant vanilla pudding mix

4 cups (900 g) cold milk

1 stick (1/2 c., 113 g) butter

1/3 c. (45 g) confectioner’s sugar

1 package (8 oz, 227 g) Neufchatel cream cheese

1-1/2 containers (12 oz, 340 g all total) cool whip, thawed in the fridge

1-1/2 packages (24 oz, 680 g all total) Oreos (I use regular; use whichever you prefer.)

colored sprinkles

Directions:

1. Put pudding mix in a large bowl.  Mix in milk and set aside for a few minutes to firm up some.

2. Cream together butter and cream cheese in a large mixing bowl.  Use medium to medium-high speed and the flat beater if using a stand mixer.

3. Sift the confectioner’s sugar if lumpy and add to the butter/cream cheese mixture.  Mix well.

4. Stir in prepared pudding and cool whip.

5. Place Oreo cookies about a dozen at a time in a ziploc bag and smash with a rolling pin or the back of a small, sturdy frying pan.  An 8″ cast iron skillet makes quick work of this :))  Once turned to crumbs, place in a medium bowl and set aside.   Don’t worry if they’re a bit lumpy.  Continue until all cookies are crushed.

6.  Layer the cookies and cream mixtures in a trifle dish, clean flower pot, clean dump truck (serve with a shovel :)), or other deep dish, starting and ending with the dirt.  Sprinkle dirt layers with colorful sprinkles if so desired; I don’t, but it would be very colorful and kids would love it :)).  If you have any leftover cream mixture, it freezes well so you can save it.

7.  I sprinkled the top with candy sprinkles, but you can add gummy worms or wrap the bottom of a plant in plastic wrap and stick it down in there to make it look like a potted plant.

Enjoy!

Cream Cheese Thumbprint Cookies

This recipe was given to me by my aunt in Michigan originally; she is an amazing cook.  I just modified it a bit to make a thumbprint cookie out of it.  There is a lot you can do with this cookie for one with so few ingredients – four!  Egg, cream cheese, butter, and cake mix.

To make the thumbprint cookie, I of course added one more ingredient, jam.

You could use sooo many different kinds of cake mix tho.  I use Butter, but you could use Yellow, Devil’s Food, or whatever your favorite is.  You may want to add an extra egg for Devil’s Food since cocoa tends to create a dryer product unless more moisture/fat is added.  You could also omit the thumbprint and sprinkle with colored sugar.  Red and/or green sprinkled cookies are especially pretty at Christmas 🙂

A note on the brand of cake mix.  I have been told for as long as I can remember that I should buy stock in Duncan Hines.  They have received lots of free advertising from me over the years.  When I buy a mix, that’s all I buy.  Unless you have found a cake mix that is as consistently moist as Duncan Hines, if you use a different brand of cake mix for this recipe, I recommend adding an extra egg for moisture.

You just mix the ingredients together, refrigerate for an hour, drop them out onto parchment lined cookie sheets, and bake.  For thumbprints, I baked them for 7 minutes, pulled them out, used a round 1/2 teaspoon measure to make a nice dip in them, and put in about a 1/2 teaspoon of slightly warmed jam.

I then returned them to the oven for about 3 minutes and pulled them out.

For blue and gold cookies for cubscouts, I used a pureed homemade fresh blueberry pie filling for the thumbprint 🙂

Ingredients:

1 extra large egg

1 butter-flavored cake mix (I prefer Duncan Hines by far)

1 package (8 oz, 114 g) cream cheese (Neufchatel ok; this has less fat than regular cream cheese.)

1/2 stick (2 oz, 57 g) butter

1/4 c. (80 g) raspberry jam, or whatever flavor you like

Directions:

1) Cream together cream cheese and butter using either a wooden spoon or the flat beater attachment on a stand mixer.

2) Add in cake mix and egg and continue mixing.  Once thoroughly mixed, cover with wrap and refrigerate for an hour.

3) Preheat oven to 350F (177C).  While preheating, drop cookies onto a parchment lined cookie sheet using either a cookie scoop or knife and spoon.

4) Bake for 7 minutes.  Meanwhile, preheat jam either in pyrex cup in warm water or in a microwave.  You just need to warm it enough to drop it by spoon into the cookies.  Do not liquify it 🙂

5) If making thumbprint cookies:  After 7 minutes, pull the cookies out.  They may have a few brown tips on the cookies here and there, but will not have much.  Use a 1/2 teaspoon measuring spoon to make a little dip in the middle of them.  Add in warmed jam.  I found it easier to use a 1/4 teaspoon measure to do this, having it nicely rounded so I was really putting in slightly under 1/2 of a teaspoon of jam into each cookie.

If _not_ making thumbprints, do not pull them out until they are done, after about 10 minutes.

6)  Put the cookies back in the oven for 3 minutes.

7) Pull the cookies out of the oven and cool on a rack.  They’re bottoms should be a nice golden brown, but the tops will just have a few brown tips.

These are a very different cookie for some people since they’re yellow, but one bite of this soft, flavorful cookie and they’ll be won over 🙂

Cracker Cookies

Many of my favorite dessert recipes originated from my Grandma.  This is another of those.  She was an outstanding cook and whenever we’d visit at Christmas, I’d sneak cookies out of the back room where she kept them.  It didn’t matter that some cookies were already set out, I wanted to see what other kinds were there as well. 🙂  I also copied a few recipes each time we visited.  When she passed, I was given her much treasured recipe box.  She made two kinds of cracker cookies.  One was with graham crackers and called Sunshine Crisps; this one is made with saltines and simply called cracker cookies.  They take a couple of minutes on the stovetop and 10 minutes in the oven.

Gather together a sleeve of saltine crackers and lay them out on a 10.5″ x 15.5″ (27 x 39 cm) stoneware dish with a short lip if you have it.  Otherwise, a jellyroll pan or other pan with sides will work fine, but you will want to cover the bottom with parchment or heavy duty foil.

Next you’ll gather together vanilla extract, butter, brown sugar, and chocolate chips (I prefer semi-sweet for this recipe.)  If you’d like to make these Christmasy, also put a couple of candy canes in a zip-closed bag and smash them with a sturdy saute pan to crush them.

You’ll need a small saucepan to melt together your butter and sugar.  Once melted you simply add the vanilla and pour the mixture over the saltines.  Pop it in the oven for 10 minutes, remove, and add your chocolate and mint if desired.

Separate and cool in the fridge and you’re done!

Here are the details:


Ingredients:

About 40 saltine crackers

1 c. butter (1/2 lb, 227 g)

1 c. lightly packed light brown sugar (200 g)

9 oz chocolate chips (255 g)

1 tsp vanilla (5 ml)

candy canes or peppermints, optional.


Directions:

Preheat oven to 350 F (177 C).

Lay saltines out on a 10.5″ x 15.5″ (27 x 39 cm) stoneware jelly roll pan or other pan with a short lip around the sides.  If you do not use stoneware, line your pan with parchment or heavy duty foil before laying out the crackers.  If you don’t they will stick big time.

Put butter and brown sugar in a small saucepan on medium heat.  Melt completely and remove from heat; this takes 1-2 minutes.  Stir frequently, do not boil, and do not leave this on the heat too long or it will thicken and burn.

Add the vanilla extract to the butter and brown sugar mixture and pour over the saltines.

Put in the preheated oven for 10 minutes.

Remove, add chocolate chips and let them rest a moment.  You’ll see them turn glossy.  Spread them to cover the crackers. Sprinkle with crushed mints if desired (To crush: throw them in a zip-closed bag and smash them with a sturdy saute pan.).

To cool, remove them from the stoneware to either a large plastic container or lined cookie sheet (wax paper, parchment, or the glossy side of freezer paper all work well) and put it in the fridge.  I don’t recommend cooling first and then separating as they’ll stick together.

Enjoy!


%d bloggers like this: